Inside the IOTA DPP Demonstrator: A Code-Level Walkthrough
Most conversations about Digital Product Passports focus on what data to store. Battery capacity, material composition, repair history. These are important questions, but they skip the harder architecture problems: who gets to write to a product's record? How do users interact without holding cryptocurrency? How do you verify that a product claiming to be from Acme Electronics is actually from Acme Electronics?
The IOTA Foundation published a reference implementation that answers these questions with working code. It's live at dpp.demo.iota.org. I walked through every file in this repository. Here's what I found.
Note: The DPP Demonstrator is under continuous development to keep pace with the evolving IOTA Trust Framework. Some of the code patterns and APIs described here may change as new components reach production readiness. For example, IOTA Audit Trails (the official product for on-chain lifecycle records) and IOTA Secret Storage (with a HashiCorp Vault adapter for key and credential management) are both on the roadmap. When these ship, parts of the current custom Move contract logic and key handling will be replaced by their official counterparts.
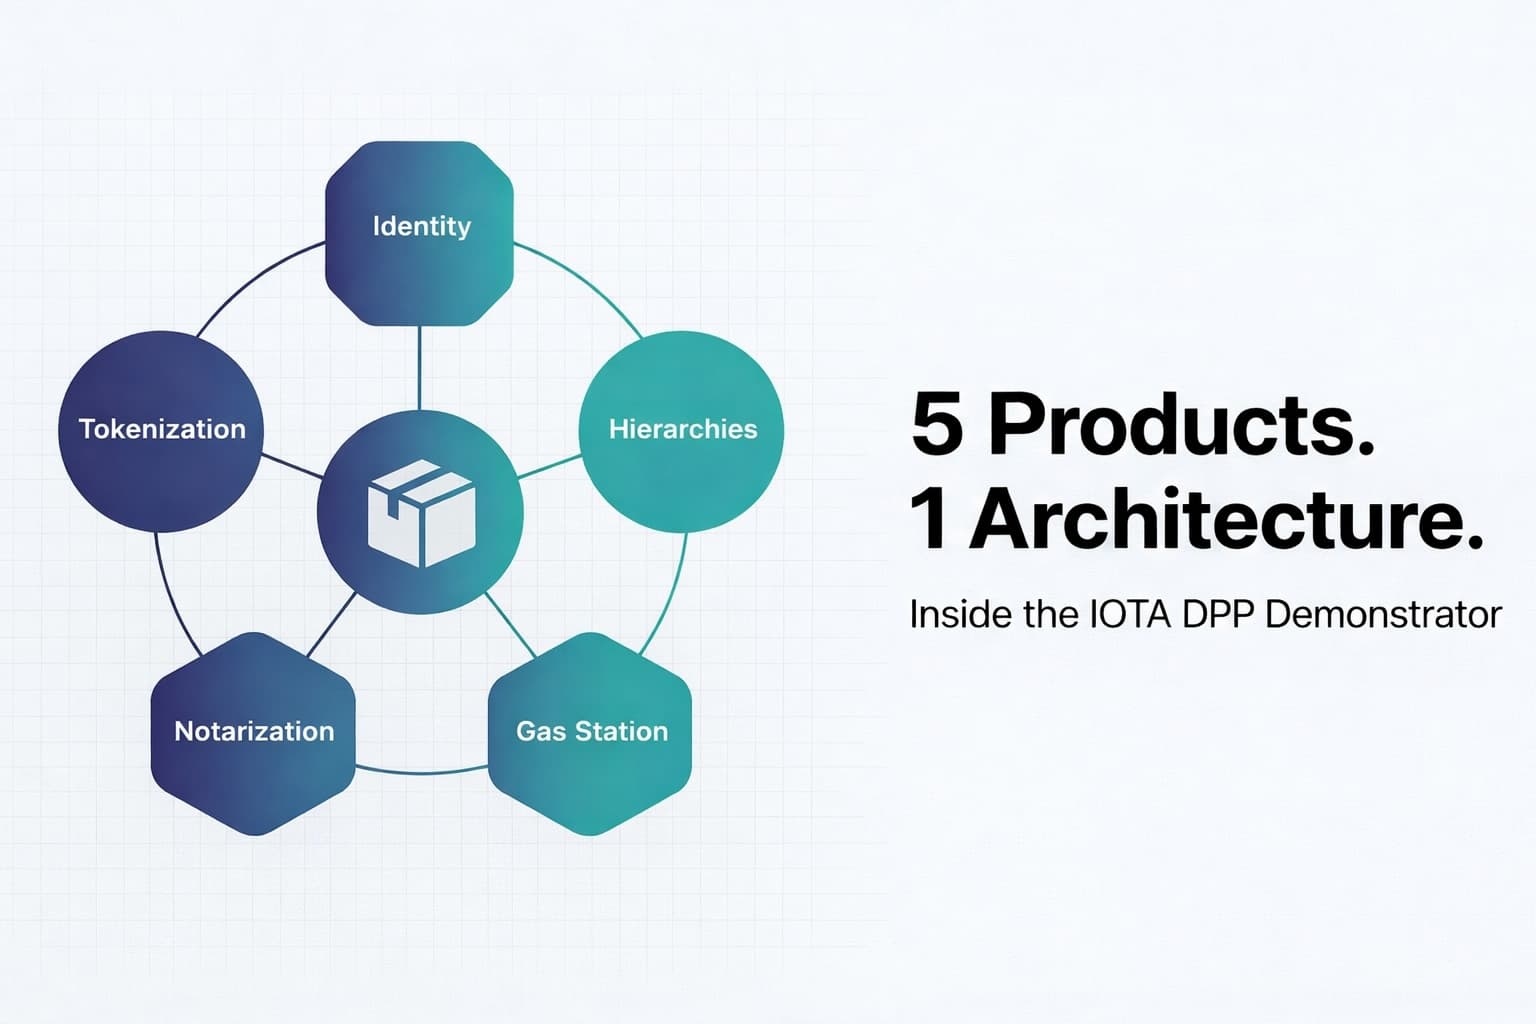
This is not a production DPP system. It's a reference architecture showing how five IOTA products work together to solve the orchestration challenges that come up when building a product passport. If you've read our overview of the IOTA Trust Framework, this article goes one level deeper: into the actual code. If you're evaluating whether blockchain makes sense for your DPP implementation, this codebase is where theory meets reality.
The Architecture: Three Layers, Five Products
The demonstrator is a three-tier application:
Behind these layers, five IOTA products handle the orchestration:
- IOTA Hierarchies - On-chain role-based permissions (who can write to a product's record?)
- IOTA Gas Station - Transaction fee sponsorship (users don't need to hold IOTA tokens)
- IOTA Identity - Decentralized identifiers and Domain Linkage for manufacturer verification
- IOTA Notarization - On-chain product lifecycle records and service history
- IOTA Tokenization - LCC reward tokens and NFT badges for service providers
The key architectural insight: a DPP is not just a smart contract problem. It's a coordination problem. You need permissions enforced on-chain, identity verified bidirectionally, and a user experience that doesn't require crypto literacy. This demonstrator shows how to wire those pieces together.
How a Repairer Logs a Service Record
To see how these components interact, follow the full lifecycle: from authorization to on-chain record. The repairer connects a wallet and the frontend sends the wallet address to the backend API. The backend, acting as the manufacturer, adds that address to the Hierarchies Federation with the "repairer" role. Once authorized, the repairer builds a transaction, the Gas Station covers the fee, and the Move contract validates the role on-chain before writing the service entry.

Each section below unpacks one of these components in detail: how Hierarchies enforce the trust chain, how the Move contract validates roles and writes records, how the Gas Station sponsors transactions, and how Domain Linkage verifies manufacturer identity.
Trust Chain via IOTA Hierarchies
The first challenge: permissions. In a product passport system, different participants need different write access. A manufacturer should be able to create products. A repair shop should be able to log service entries. But a random address on the internet should not.
The demonstrator implements a three-level hierarchy:
Root of Authority (e.g., regulatory body)
    └── authorizes → Manufacturer
                          └── authorizes → Repairer
This is not a backend database enforcing roles. The validation happens on-chain, inside the Move smart contract. Here's the actual code from contract/sources/audit_trails.move:
if (validate_property(
    federation,
    &object::id_from_address(ctx.sender()),
    new_property_name(string::utf8(b"role")),
    new_property_value_string(string::utf8(b"manufacturer")),
    clock
) == false) {
    abort E_INVALID_ISSUER
};
This runs inside the Move VM. If you don't have the "manufacturer" role in the Federation, your transaction aborts. No backend API can bypass this check. The trust chain is anchored on-chain.
The setup happens in backend/src/scripts/init_hierarchies.rs. The Root of Authority creates a Federation, defines the role property (manufacturer, repairer), and issues attestations. The manufacturer can then delegate authority to service providers without going back to the root. This is the pattern IOTA Hierarchies was built for: structured, delegated permissions that scale without centralized bottlenecks.
When a new repairer needs to be added, the backend calls the Hierarchies SDK:
hierarchies_client
    .create_accreditation_to_attest(
        federation_id,
        user_object_id,
        [user_properties]
    )
    .build_and_execute(&hierarchies_client)
    .await?;
This creates an attestation on-chain. From that point forward, the repairer's address can call log_entry_data() in the smart contract, and the role validation will pass.
What Lives On-Chain: Smart Contracts and Service History
The Move contracts define two primary structs: Product and ProductEntry.
Product (Shared Object)
public struct Product has key, store {
    id: UID,
    federation_addr: address,
    name: String,
    serial_number: String,
    manufacturer: String,
    bill_of_materials: VecMap<String, String>,
    timestamp: u64,
    reward_type: RewardType
}
The Product is a shared object. Any authorized participant can interact with it without transferring ownership. The federation_addr links the Product to a specific Hierarchies Federation. Every operation validates the caller's role against that Federation.
The bill_of_materials is a flexible key-value map (VecMap<String, String>). In a real DPP system, this would hold component identifiers, material declarations, and compliance metadata. In the demonstrator, it's simplified for clarity.
The reward_type field determines whether service providers earn LCC tokens or NFT badges. This is the incentive layer: perform services, earn rewards.
ProductEntry (Service Records)
public struct ProductEntry has key, store {
    id: UID,
    issuer_role: Role,
    issuer_addr: address,
    entry_data: VecMap<String, String>,
    timestamp: u64
}
When a repairer logs work, the contract creates a ProductEntry and transfers it to the Product's address. This creates an on-chain ownership chain. The Product owns its service history. You can query the IOTA ledger and reconstruct the entire lifecycle: who worked on this product, when, and what they did.
The Core Business Logic
The log_entry_data() function in audit_trails.move is where everything comes together:
- Validate Federation match: Is the caller acting in the correct Federation?
- Validate role: Does the caller have the "manufacturer" or "repairer" role?
- Create ProductEntry: Record the service data with timestamp.
- Transfer entry to Product address: Link the service record to the product on-chain.
- Dispatch reward: Pay the service provider in LCC tokens or mint an NFT badge.
The role validation is the critical step. It imports the Hierarchies package (use hierarchies::main::{Federation, validate_property}) and calls the validation function directly. This means the trust enforcement is inside the Move VM, not delegated to an external service.
The reward dispatch is automatic. If the Product's reward_type is set to LCC, the contract splits 1 LCC token from the Vault and transfers it to the service provider. If it's set to NFT, the contract mints a badge (one per address, enforced by a whitelist). This creates an incentive loop: perform real services, earn tokens.
Gas Station: The "Gasless" User Experience
Here's the problem: in a traditional blockchain dApp, users need to hold native tokens to pay transaction fees. For a DPP system, this is a non-starter. A repair shop should not need to buy IOTA tokens to log a service entry.
IOTA Gas Station solves this with sponsored transactions. The flow has three steps:
Step 1: Reserve Gas
The frontend calls the Gas Station's /v1/reserve_gas endpoint (proxied through a Next.js API route to keep the Gas Station token server-side):
const requestData = {
  gas_budget: 100_000_000,        // 100M IOTA units
  reserve_duration_secs: 180,      // 3-minute reservation
};

const response = await fetch(`${GAS_STATION_URL}/v1/reserve_gas`, {
  method: 'POST',
  headers: {
    Authorization: `Bearer ${GAS_STATION_TOKEN}`,
    'Content-Type': 'application/json',
  },
  body: JSON.stringify(requestData),
});

return (await response.json()).result;
// Returns: { sponsor_address, gas_coins, reservation_id }
The Gas Station reserves gas coins for this transaction and returns a reservation ID.
Step 2: Build and Sign Transaction
The frontend builds the Move call with the sponsored gas:
const tx = createDppTx(IOTA_CUSTOM_NOTARIZATION_PKG_ID, {
  dppId: DPP_ID,
  federationAddr: FEDERATION_ID,
  issuerRole: "repairer",
  entryDataKeys: ["service_type", "description"],
  entryDataValues: ["Battery replacement", "Replaced 12V battery"],
  whitelistId: WHITELIST_ID,
  vaultId: VAULT_ID,
});

tx.setSender(userAddress);
tx.setGasOwner(gas.sponsor_address);
tx.setGasPayment(gas.gas_coins);
tx.setGasBudget(Number(gas.gasBudget));
The user signs this transaction with their Nightly Wallet. They don't pay gas. The sponsor does.
Step 3: Execute with Sponsor Signature
The frontend sends the signed transaction and reservation ID to the Gas Station's /v1/execute_tx endpoint:
const data = {
  reservation_id: reservationId,
  tx_bytes: toB64(transaction),
  user_sig: userSignature,
};

const response = await fetch(`${GAS_STATION_URL}/v1/execute_tx`, {
  method: 'POST',
  headers: {
    Authorization: `Bearer ${GAS_STATION_TOKEN}`,
    'Content-Type': 'application/json',
  },
  body: JSON.stringify(data),
});

return (await response.json()).effects;
The Gas Station adds its own signature (as the gas payer) and submits the transaction to the IOTA network.
Critical fact: IOTA is not feeless. A transaction costs approximately 0.005 IOTA. The Gas Station abstracts this cost away from the user, but someone pays. In a production DPP system, the manufacturer or platform operator would fund the Gas Station.
The Gas Station configuration in config.yaml shows how to tune concurrency:
gas-station:
  coin-init:
    target-coin-balance: 500000000    # Each gas coin split target (500M units)
    target-coin-count: 100             # Pre-split coins for parallel transactions
  cap:
    daily-gas-usage-cap: 100000000000  # Safety limit per day
The Gas Station pre-splits its IOTA tokens into 100 separate coins. This allows it to sponsor up to 100 concurrent transactions without coin object contention. Redis manages nonces to prevent double-spending. This pattern is critical for high-throughput DPP systems where multiple service providers are logging entries simultaneously.
Identity and Domain Linkage: Verifying Manufacturer Identity
The third challenge: identity verification. When a user scans a product's DPP, they need to know: is this really made by Acme Electronics, or is this a counterfeit claiming to be Acme?
The demonstrator uses Domain Linkage, a W3C standard for bidirectional verification between a DID and a domain.
Creating the DID with LinkedDomainService
The backend (backend/src/lib/identity.rs) creates a DID document and publishes it on-chain:
let mut did_document = IotaDocument::new(identity_client.network());
did_document.generate_method(
    &keytool_storage,
    KeyType::new("secp256r1"),
    JwsAlgorithm::ES256,
    None,
    MethodScope::VerificationMethod,
).await?;

// Add LinkedDomainService
let domain_url = Url::parse(&std::env::var("NEXT_PUBLIC_DAPP_URL")?)?;
let mut domains = OrderedSet::new();
domains.append(domain_url);

let service_url = did_document.id().clone().join("#domain-linkage")?;
let linked_domain_service = LinkedDomainService::new(
    service_url, domains, Object::new()
)?;
did_document.insert_service(linked_domain_service.into())?;

// Publish to IOTA ledger
let did_document = identity_client
    .publish_did_document(did_document)
    .build_and_execute(&identity_client)
    .await?
    .output;
The DID document now includes a LinkedDomainService that says: "I, this DID, claim to control acme-electronics.com."
Next, the manufacturer signs a DomainLinkageCredential as a JWT and hosts it at /.well-known/did-configuration.json. You can inspect the live credential from the demonstrator at dpp.demo.iota.org/.well-known/did-configuration.json. The credential is a standard JWT, so you can decode and inspect it with any JWT parser such as jwt.io. Here is what the decoded payload looks like:
{
  "exp": 1792515047,
  "iss": "did:iota:testnet:0xdc704ab63984d5763576c12ce5f62fe735766bc1fc9892a5e2a7be777a9af897",
  "nbf": 1760979047,
  "sub": "did:iota:testnet:0xdc704ab63984d5763576c12ce5f62fe735766bc1fc9892a5e2a7be777a9af897",
  "vc": {
    "@context": [
      "https://www.w3.org/2018/credentials/v1",
      "https://identity.foundation/.well-known/did-configuration/v1"
    ],
    "type": ["VerifiableCredential", "DomainLinkageCredential"],
    "credentialSubject": {
      "origin": "https://dpp.demo.iota.org/"
    }
  }
}
Notice how iss and sub both reference the same DID, and credentialSubject.origin points back to the demo domain. This is the anchor that ties the on-chain identity to the web domain.
Bidirectional Verification
The frontend verifies the link in both directions (frontend/src/helpers/verifyDomainLinkage.ts):
Direction 1: DID → Domain
Start with the DID document (from the IOTA ledger), find the LinkedDomainService, fetch the /.well-known/did-configuration.json from the domain, and verify the JWT signature matches the DID. You can resolve the demonstrator's DID yourself using the Universal Resolver:
{
  "id": "did:iota:testnet:0xdc704ab63984d5763576c12ce5f62fe735766bc1fc9892a5e2a7be777a9af897",
  "verificationMethod": [{
    "id": "...#HbQOoYV9Mf4bxPBPA40yEHjOiZM2N-fAZYSC4KVAv0w",
    "controller": "did:iota:testnet:0xdc704ab63984d5763576c12ce5f62fe735766bc1fc9892a5e2a7be777a9af897",
    "type": "JsonWebKey2020",
    "publicKeyJwk": {
      "kty": "EC",
      "alg": "ES256",
      "crv": "P-256",
      "x": "pRdSD80g9OahxU3rv-ayFvP7At-3v856Fkh0IvzBed8",
      "y": "ptTQX3XVH7lrXIs77k7USRtYIC3UPGrYrzsWn5QNl6E"
    }
  }],
  "service": [{
    "id": "...#domain-linkage",
    "type": "LinkedDomains",
    "serviceEndpoint": "https://dpp.demo.iota.org/"
  }]
}
The service array contains the LinkedDomains entry pointing to https://dpp.demo.iota.org/. The verificationMethod holds the public key used to sign the DomainLinkageCredential JWT above.
Direction 2: Domain → DID
Start with the company's website, fetch /.well-known/did-configuration.json, extract the DID from the JWT, resolve the DID from the IOTA ledger, and verify the DID document includes a LinkedDomainService pointing back to the domain.
Both directions must validate. If someone creates a fake DID claiming to be Acme, they cannot produce a valid JWT hosted at the real acme-electronics.com domain (they don't control the web server). If someone compromises the domain, they cannot forge the DID's on-chain signature (they don't have the private key).
This is stronger than SSL certificates alone. It cryptographically binds the on-chain identity to the real-world domain, and both sides can verify independently.
Getting Started: Clone and Explore
The demonstrator includes an eight-step bootstrap sequence (defined in the Makefile):
make init-accounts- Creates Root Authority, Manufacturer, and Gas Station IOTA accountsmake faucet- Funds accounts from the IOTA testnet faucetmake init-hierarchies- Creates the Federation, adds the "role" property, creates attestations for the Manufacturermake publish-custom-notarization-contract- Deploys the Move package, outputs PKG_ID, WHITELIST_ID, VAULT_IDmake init-dids- Creates DID documents with domain linkage, outputs thedid-configuration.jsonfilemake create-new-product- Creates the first Product on-chainmake mint-llc- Mints LCC tokens using the TreasuryCapmake top-up-reward-pool- Deposits LCC tokens into the Vault for the created product
Once this is complete, run make dev-start to launch the Gas Station, Redis, frontend, and backend. The app runs at http://localhost:3000/introduction/1.
If you want to understand how these pieces fit together, here are the key files:
| File | What It Shows |
|---|---|
contract/sources/audit_trails.move | Product struct, ProductEntry, role validation logic, reward dispatch |
backend/src/scripts/init_hierarchies.rs | Federation setup, role property definition, attestation creation |
backend/src/services/blockchain.rs | Blockchain adapter (IOTA client, Hierarchies SDK calls, transaction building) |
backend/src/handlers/permission_handler.rs | REST endpoint to grant roles and add addresses to the Federation |
frontend/src/helpers/transaction.ts | Transaction builder (constructs the Move call with sponsored gas) |
frontend/src/app/api/sponsor-request/route.ts | Next.js API route to reserve gas (proxies Gas Station token server-side) |
frontend/src/app/api/send-tx/route.ts | Next.js API route to submit signed transaction to Gas Station |
frontend/src/helpers/verifyDomainLinkage.ts | Bidirectional domain linkage verification |
frontend/src/components/AppLayout.tsx | Wallet integration (@iota/dapp-kit WalletProvider, IOTA Wallet, Nightly Wallet) |
config.yaml | Gas Station configuration (coin splitting, daily caps) |
docker-compose.dev.yml | Docker Compose for local development (Gas Station + Redis services) |
.env.example | All environment variables (frontend URLs, package IDs, backend keys) |
This is a reference architecture, not a production system. For production, you would need:
- Proper key management (HSM for the Gas Station keypair)
- Rate limiting and authentication (prevent abuse of sponsored transactions)
- Privacy layer (off-chain data storage with on-chain hashes for sensitive information)
- Regulatory compliance (ESPR-specific data fields, retention policies)
- Multi-signature for critical operations (product creation, role assignment)
But the core patterns are here. Role-based permissions enforced on-chain. User experience abstracted through sponsored transactions. Manufacturer identity verified bidirectionally. Product lifecycle history stored as an on-chain ownership chain.
Building a Digital Product Passport? Our team has hands-on experience with IOTA Hierarchies, Gas Station, and Identity integration.
Request a Free ConsultationWhat This Codebase Reveals About Production DPP Systems
The hardest part of building a DPP system is not the smart contract. It's wiring five separate concerns into a coherent architecture: Hierarchies for on-chain permissions, Gas Station for fee abstraction, Identity and Domain Linkage for manufacturer verification, Notarization for product lifecycle records, and Tokenization for service provider incentives. Each solves one problem. The architecture emerges from how they connect.
This demonstrator also exposes the gaps. Key management relies on local keystores. There is no privacy layer for sensitive product data. The Gas Station has no rate limiting. These are the exact decisions you will face when moving from reference architecture to production, and the eight-step bootstrap sequence maps each one.
The repository is public. Clone it, run the setup, and trace the transaction flow from wallet connection to on-chain service record. The code will surface architectural questions that no whitepaper can answer.
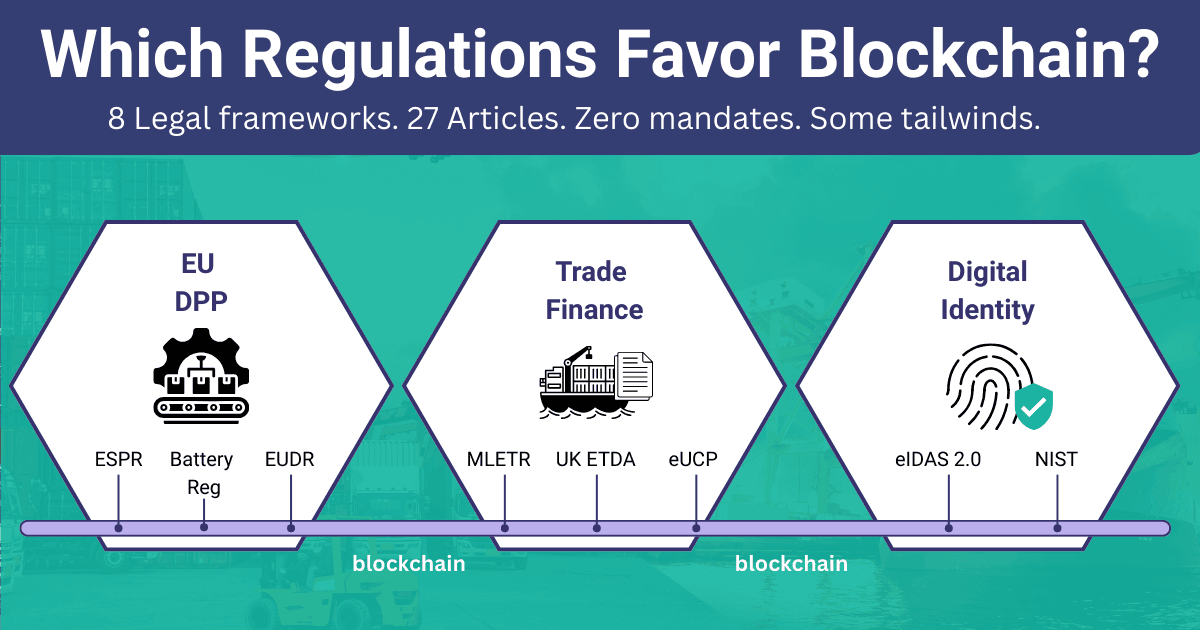
For more background on the IOTA Trust Framework, see our technical overview. For a live example of IOTA notarization in a different domain, explore our Trade Finance Validator.
Need help implementing Digital Product Passport?
Schedule a free consultation to explore how KChain Solutions can help your organization implement production-grade blockchain architecture.

Valerio Mellini
Founder & IOTA Foundation Solution Architect
10+ years in software architecture across Accenture, PwC, Wolters Kluwer, and Ubiquicom. Certified Blockchain Solutions Architect. Helping enterprises implement production-grade blockchain systems with architecture-first methodology.